
Connect LifeOS to AI clients
Use LifeOS Skill in WorkBuddy, Doubao Work, Codex, Cherry Studio, and other clients to query tasks, organize notes, and work with the same local Markdown vault. Clients with a built-in browser can also display Aino Web directly, with calendars, tasks, topic indexes, and file editing. Aino Desktop and Obsidian do not need to stay open.
Copy the setup prompt
Copy this entire prompt into your current AI client. No command or vault-path editing is required. The AI first uses your current project; if no folder is available, it asks you to select your vault. Use an Agent mode with local file and terminal tools.
After setup, say “LifeOS”, “Show this week's tasks”, or “Open the calendar”. When the client supports embedded webpages, the workbench appears beside the conversation. Terminal clients such as Codex / Claude Code use the browser entry for the same workbench. Complete any required first-time permissions, folder selection, or manual skill import through the client.
Download the Skill or connect manually
The public repository ZIP currently contains a single-entry skill inside a repository folder. It is not the complete six-skill bundle, nor a universally importable upload package. Extract it to inspect SKILL.md and its references. Use the prompt above with the CLI to obtain the complete bundle. For manual import, use the six directories installed below and package them as required by your client.
Prepare the vault and runtime
Use an Agent mode with local file and terminal tools. Select your vault as its working directory, or pass vault="/path/to/My Vault" explicitly. Chat-only mode, retrieval, and uploaded copies do not provide access to the original folder.
Install Node.js 24 or later, including npx, in the environment that actually runs commands. A cloud sandbox cannot access your local folder merely because Node.js is installed on your computer; use local execution with access to that folder.
Open a terminal in the vault, inspect the current installation, then install the complete bundle:
Replace the example with your vault's absolute path. Review local changes before updating, then check backups and custom rules.
The installer writes these directories under .agents/skills/:
If your client does not discover project skills, import all six directories. Preserve each SKILL.md, references/, and assets/; copying the instructions alone is insufficient.
For ZIP-only importers, archive the contents of each skill directory separately, with SKILL.md at the archive root. Do not upload the entire GitHub repository archive as one skill. Ask the Agent to verify all six skills and cross-skill references after import. Resolve references first if the importer rearranges their directories.
WorkBuddy
Start with the setup prompt above. Use these manual steps if automatic import or enablement is unavailable.
- Open Skills → Add Skill → Upload Skill and import the local packages.
- Install and enable all six skills. The documented conversational installation flow is for marketplace skills; use upload for custom packages.
- Select your vault for the task, grant the required file and command permissions, and run the read-only check below.
See the official WorkBuddy skill guide. This guide does not claim a LifeOS marketplace listing.
Doubao Work
Start with the setup prompt above. Use these manual steps if automatic import or enablement is unavailable.
- Use the Doubao Work desktop client and open its Skills / Connectors / Partners section (also called Plugins / Skills / Partners in some documentation).
- Use local skill import to install the complete bundle. If the entry is absent, check your version and organization restrictions.
- Select the local vault and an execution environment that can access it. Check that
npxruns before performing the read-only check.
These steps concern local tasks in Doubao Work. Ordinary Doubao chat does not imply equivalent permissions. See Feishu's official feature guide and the Doubao skill integration guide. Private import is separate from marketplace review and listing.
Cherry Studio
Start with the setup prompt above. Use these manual steps if automatic import or enablement is unavailable.
- Open Settings → Skills → Add Skill → Local import. Import ZIP files or folders containing
SKILL.mdfor all six skills. - Enable them globally, then bind them under Work → Agent menu → Edit → Skills. Bindings apply from the next message.
- Select the vault working directory, enable file and Bash tools, and keep Ask Before Acting enabled. Use a tool-capable model and run the read-only check.
A chat assistant differs from a Work Agent. Global enablement alone does not bind skills to an Agent. See Skills and tools and permissions.
Qwen Work
Start with the setup prompt above. Use these manual steps if automatic import or enablement is unavailable.
- Open Extensions → Skills → Add → Upload Skill, upload each of the six packages, and check that they are enabled.
- Explicitly request the LifeOS Skill in chat, or type
/to select an installed skill. - Select the vault for a local task. Verify file access and Node.js in the execution environment, then run the read-only check.
See the Qwen Work skill guide. Organization, cloud, and local task permissions can differ; check actual tools and results.
Codex / Claude Code
Send the setup prompt in a local project with the vault already open. Follow the client's supported Skill discovery/import rules and preserve sibling references. Verify config and profile against the same vault. Terminal clients use the browser workbench; do not assume an embedded webpage is available.
Verify with a read-only task
Send this prompt after replacing the vault path:
After confirming the correct folder, ask for today's tasks without changing files. To test writing, explicitly request a test entry and ask the Agent to read back the original file. Migration, moves, and broad overwrites still require a preview and confirmation.
skill status checks the vault bundle, not the copies imported into your client. Reimport or update those copies after upgrading, then verify Agent bindings and reference files again.
Use the visual workbench inside your client
The workbench reuses Aino Desktop's views, editor, and sidebars. A local LifeOS CLI service reads the current vault. A built-in browser is enough; MCP Apps setup is not required. Both sidebars start collapsed. Expand the knowledge library for project/topic indexes, or use the calendar and random walk.
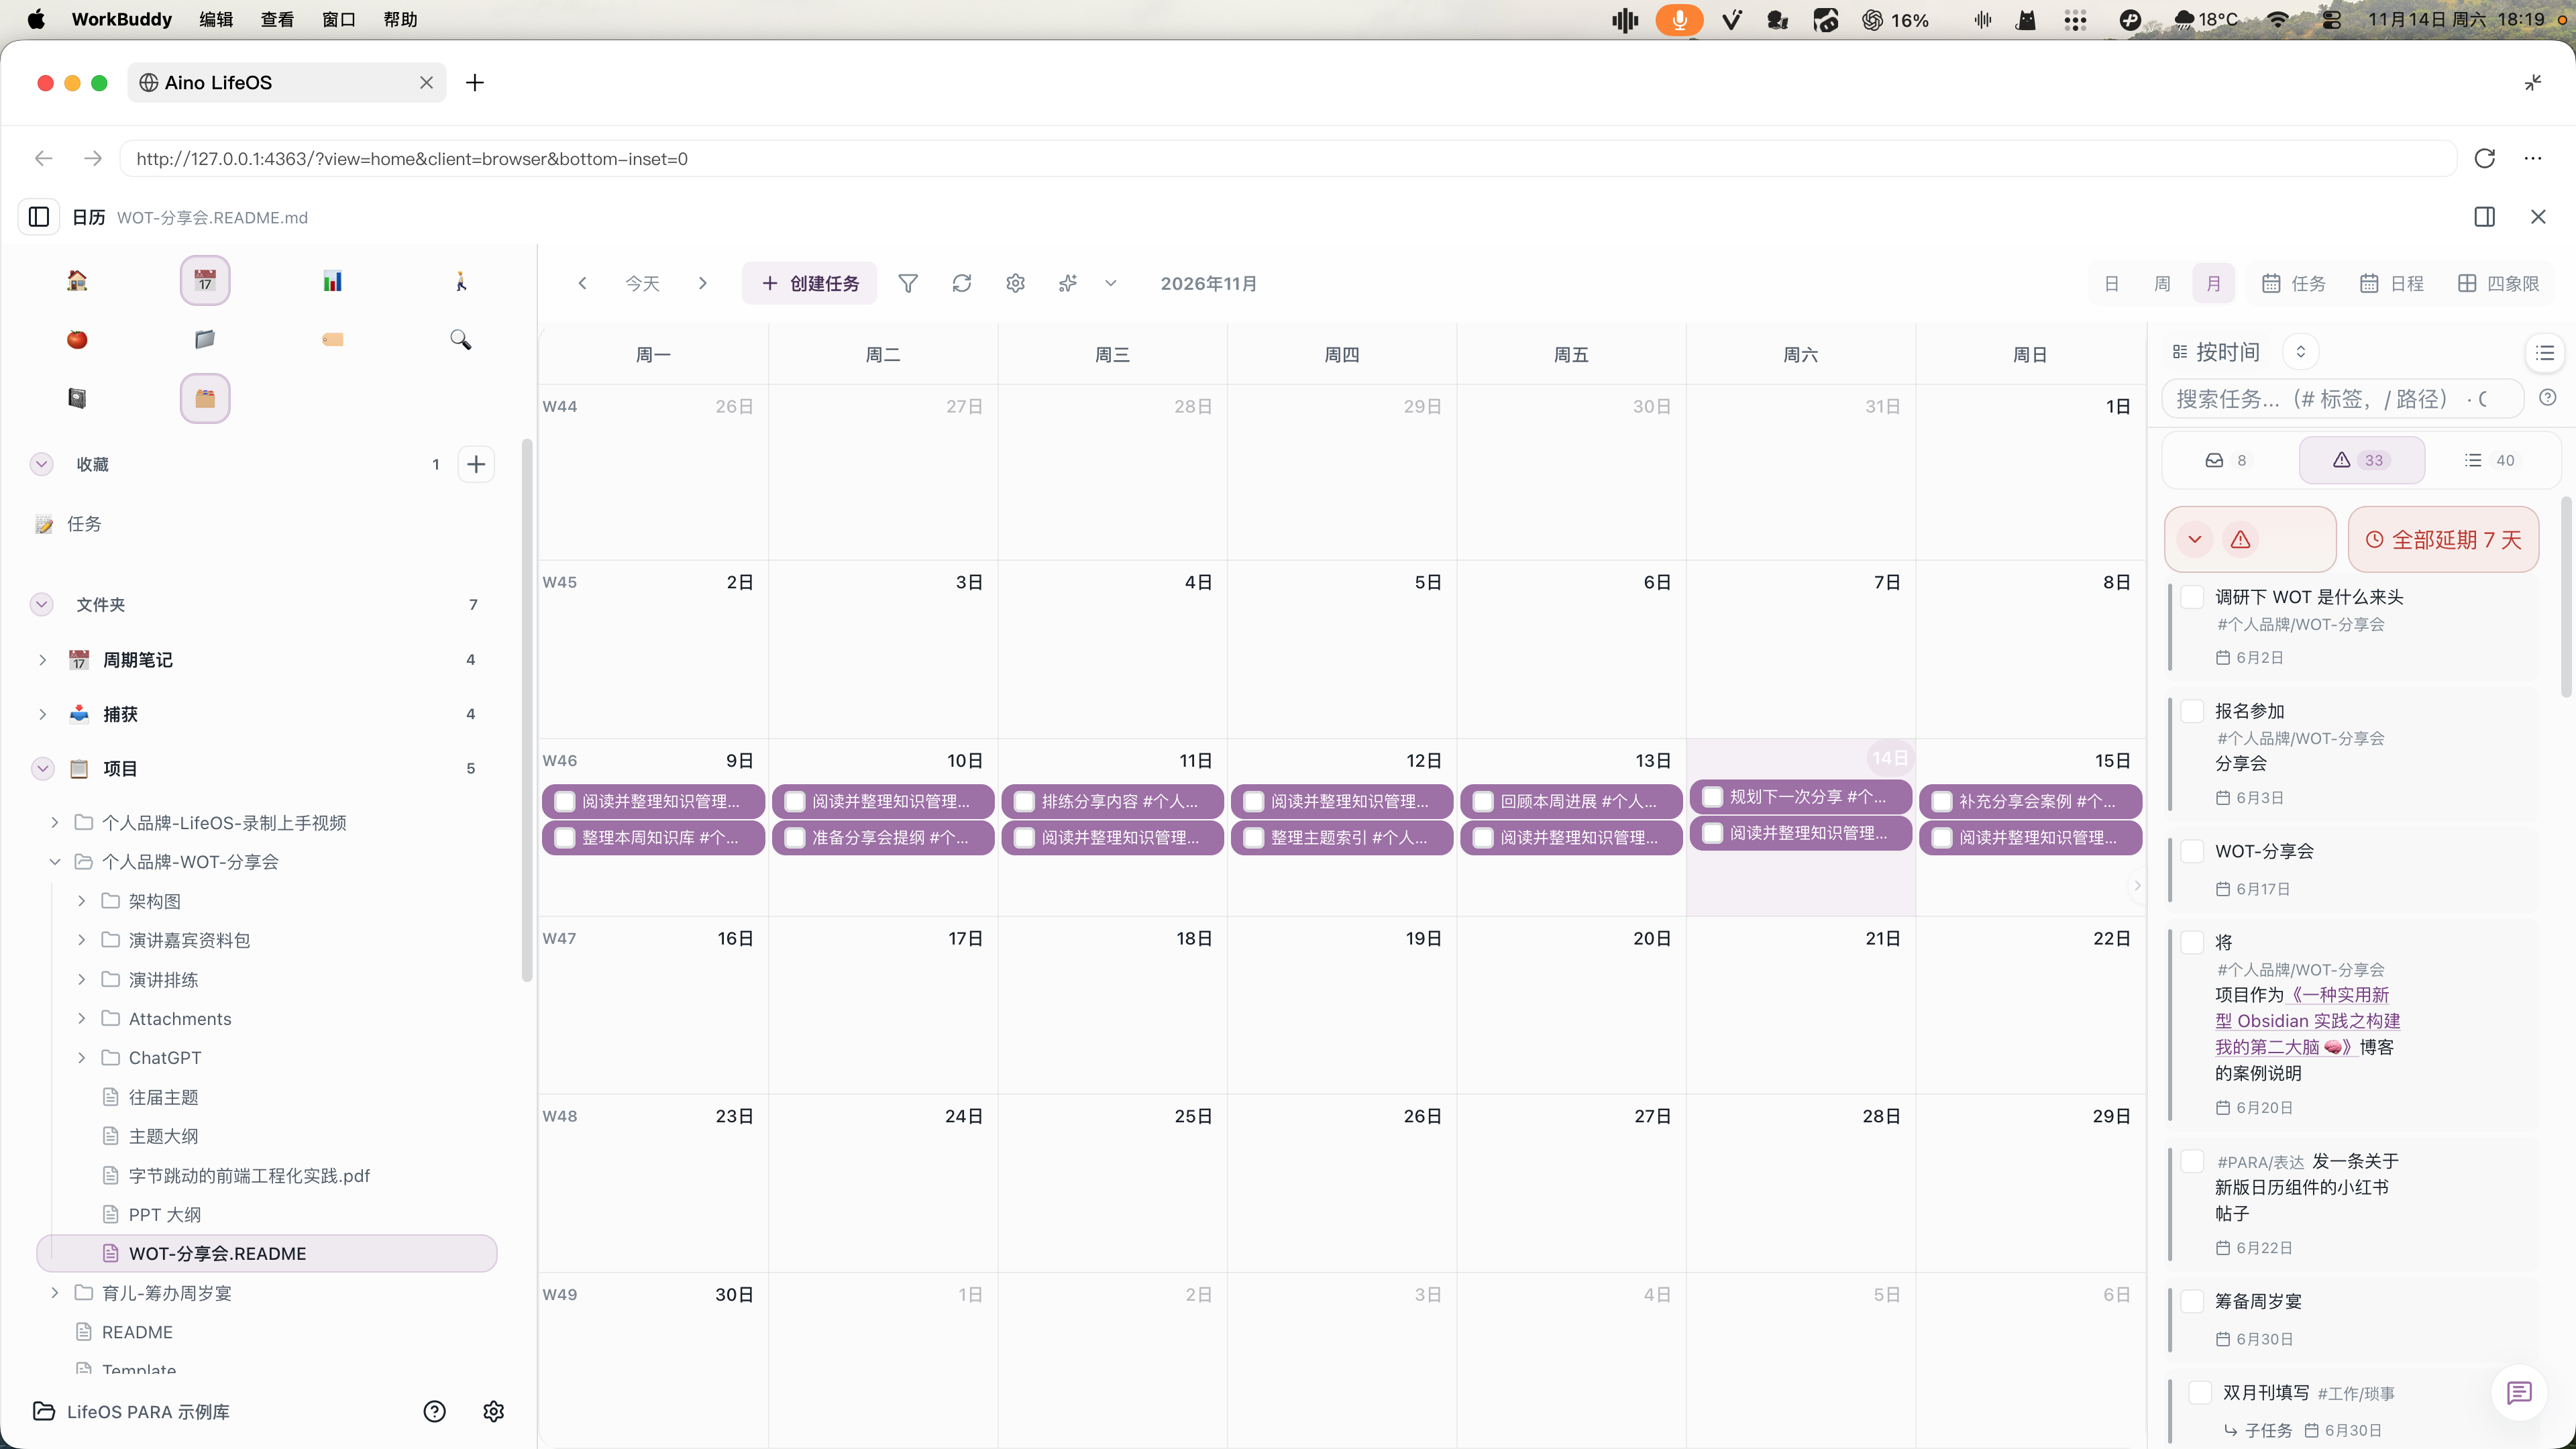
This real WorkBuddy capture shows the example vault's knowledge projects on the left and the monthly calendar with tasks on the right. The workbench connects to local Markdown files, rather than an uploaded copy of your notes.
The setup prompt checks CLI web support, vault identity, and actual page state. It reports missing capabilities, does not treat an open request as visible-page evidence, and does not silently switch vaults. The workbench follows LifeOS CLI authorization; installing Skills does not grant Pro access.
Ask the AI for a particular view:
- “Open this week's calendar in week view.”
- “Show the task board grouped by priority.”
- “Expand the knowledge projects and open the presentation's topic index.”
- “Open random walk to revisit past notes.”
Try Aino AI now
Put AI to work inside your knowledge base
Try Aino Desktop Pro free for 7 days, open a local Markdown vault, and start with a question, a summary, or one reviewable agent task.
- 7-day free trial
- Local Markdown
- Reviewable results